Setting up an IGV Data Server allows IGV users to access and explore genomic datasets located elsewhere online or on a local area network. To configure a Data Server, we need to inform IGV about where the genomic data files are located. This is a 2-step operation that includes one registry text file and one or more XML documents. Typically, these files are stored online.
- igv registry text file: it is a single text file including a list of URLs. Each URL points to a XML document that contains information about specific datasets
- dataset XML documents: one or more XML documents containing information about name and path of each genomic data file IGV will have access to
The following diagram summarizes the file structure that defines a IGV Data Server.

Setting up a Data Server (step-by-step tutorial)
Step 1: upload the data files
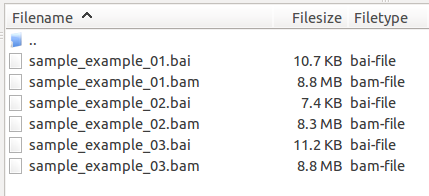
I start by generating some tiny BAM files that I will use as examples for this tutorial. I am using samtools for generating files smaller than 10 Mb and for indexing them. Then, I am moving those files to a network location (I used FileZilla for this tutorial, you can easily use ssh). For this example, I uploaded all resulting files to the following location: www.biotechworld.it/esterno/igv_data_serv).
samtools view -h Input_1_TTAGGC.sorted.bam | head -n 200000 | samtools view -bS - > sample_example_01.bamsamtools index sample_example_01.bam sample_example_01.bai
As a result, the igv_data_serv folder on the server contains 6 files.
 Step 2: XML document pointing to the data files
We need to create an XML file that points to each file that we want to make available to IGV. The structure of the XML file is highlighted here following. Briefly, each Category tag defines a group of files (for example, a full experimental set). Each Resource tag defines an individual file and requires a name attribute and a path attribute.
<?xml version="1.0" encoding="UTF-8"?>
 <Global name="An example" version="1">
<Category name="Online dataset"> <Resource name="MGC" path="http://www.broadinstitute.org/igvdata/annotations/hg19/MGCGenes.bed"> </Resource> </Category><Category name="Local Data"> <Resource name="BAM01" path="http://www.biotechworld.it/esterno/igv_data_serv/sample_example_01.bam"> </Resource> <Resource name="BAM02" path="http://www.biotechworld.it/esterno/igv_data_serv/sample_example_02.bam"> </Resource> <Resource name="BAM03" path="http://www.biotechworld.it/esterno/igv_data_serv/sample_example_03.bam"> </Resource> </Category></Global>
You can use Notepad or gedit for creating or editing a XML file (just make sure to save it with a .xml extension). For this tutorial, the XML file was saved in a subfolder of the directory containing the BAM files (link here).
Step 3: registry file
Create a text file (again, use notepad or gedit or even just the terminal shell) containing one or more URLs. Each URL points to an XML document as defined before.
echo "http://www.biotechworld.it/esterno/igv_data_serv/igv_reg/igv_datasets.xml" >> igv_registry.txt
For this tutorial, I saved a 1-line txt file at the following location: http://www.biotechworld.it/esterno/igv_data_serv/igv_reg/igv_registry.txt (the file at this URL has actually 2 lines, as explained later. However, the first line is what you need for the next steps).
Step 4: update IGV configuration
- Open IGV
- Click View and then Preferences. Select the Advanced Tab.
- Click on the Edit Server Properties checkbox.
- Edit the Data Registry URL. Type in the exact URL of the txt registry file created at the previous step
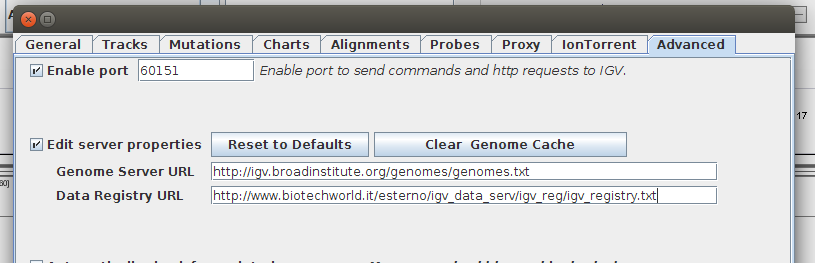
- Click OK
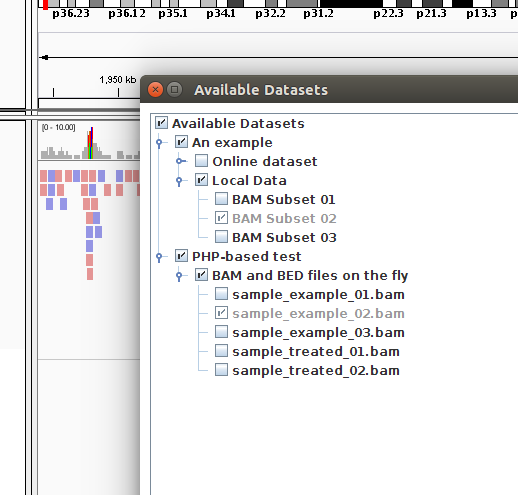
Success!! That’s it. The simplest IGV Data Server is now configured. You can open any file you included in your XML document by using the File >> Load From Server command. If you are using the same BAM files described in this tutorial and you want to visualize some reads, search for them at the beginning of chromosome 1 (for example, the GABRD gene).
Dynamic XML – smart way of
XML content can be dynamically generated on a server. For example, on an Apache server, we can use PHP for generating XML on the fly. This may be very convenient so that we don’t have to constantly edit the registry and the XML files to allow access to new data on the server. Briefly, we can use a tiny PHP script to generate a XML on the fly. This XML will include information about all genomic data files stored on the server at a given time.
- XML :: static :: needs to be updated each time we add or remove files from the server
- PHP :: dynamic :: will generate XML on the fly :: automatic detection of files of interest on the server (using regular expressions)
In the following example, I use a simple PHP file to generate a XML document. Files I don’t want included in the resulting XML (ex: bai files) will be filtered out using regular expressions. In particular, only files having a .bed or a .bam extensions will be included here (due to the regular expression rules I defined in the script).
<?php
 // set mime type to xml
 $mtype = "text/xml";
 header("Content-Type: $mtype");
 ?>
<Global name="PHP-based test" version="1"> <Category name="BAM and BED files on the fly"><?php $dir = ".."; $files = scandir($dir); foreach($files as $flname){ if (preg_match("@.+\.(bam)$@i",$flname) | preg_match("@.+\.(bed)$@i",$flname)) { ?> <Resource name="<?php echo($flname); ?>" path="http://www.biotechworld.it/esterno/igv_data_serv/<?php echo($flname); ?>"> </Resource> <?php } } ?></Category> </Global>
This file was saved at the following URL: http://www.biotechworld.it/esterno/igv_data_serv/igv_reg/igv_datasets_fly.php. As the PHP file is located on an Apache server, opening the URL will return a dynamically generated XML document. The txt registry file was also updated to include the URL pointing to the PHP file.
 Save, upload and that’s it! Now, when we open IGV and we click on File >> Load From Server, we will get also the list of BAM files generated on the fly.
This approach is convenient if data on the server are added or removed on a regular basis. For example, I can add 2 more BAM files (sample_treated_01.bam and sample_treated_02.bam together with the corresponding bai files). What happens if I access the IGV Data Server after I am done with the upload of the new files?
 Success! No need to edit any XML or TXT file. PHP did the job for us!
References
Thanks for this tutorial.
What if my files are simply in a windows network directory (like N:\igv\bam_files) and I don’t have a local web server available? Would this still work?